Activity 原生启动流程
系统界面 Launcher
为了解 VA 是如何启动 Activity 的,我们需要先知道 Android 是如何启动 Activity 的。在 Android 系统启动以后,系统已经启动了 Zygote,ServiceManager,SystemServer 等系统进程。
ServiceManager 进程中完成了 Binder 初始化;SystemServer 进程中 ActivityManagerService,WindowManagerService,PackageManagerService 等系统服务在 ServiceManager 中已经注册;最后启动了 Launcher 桌面应用。
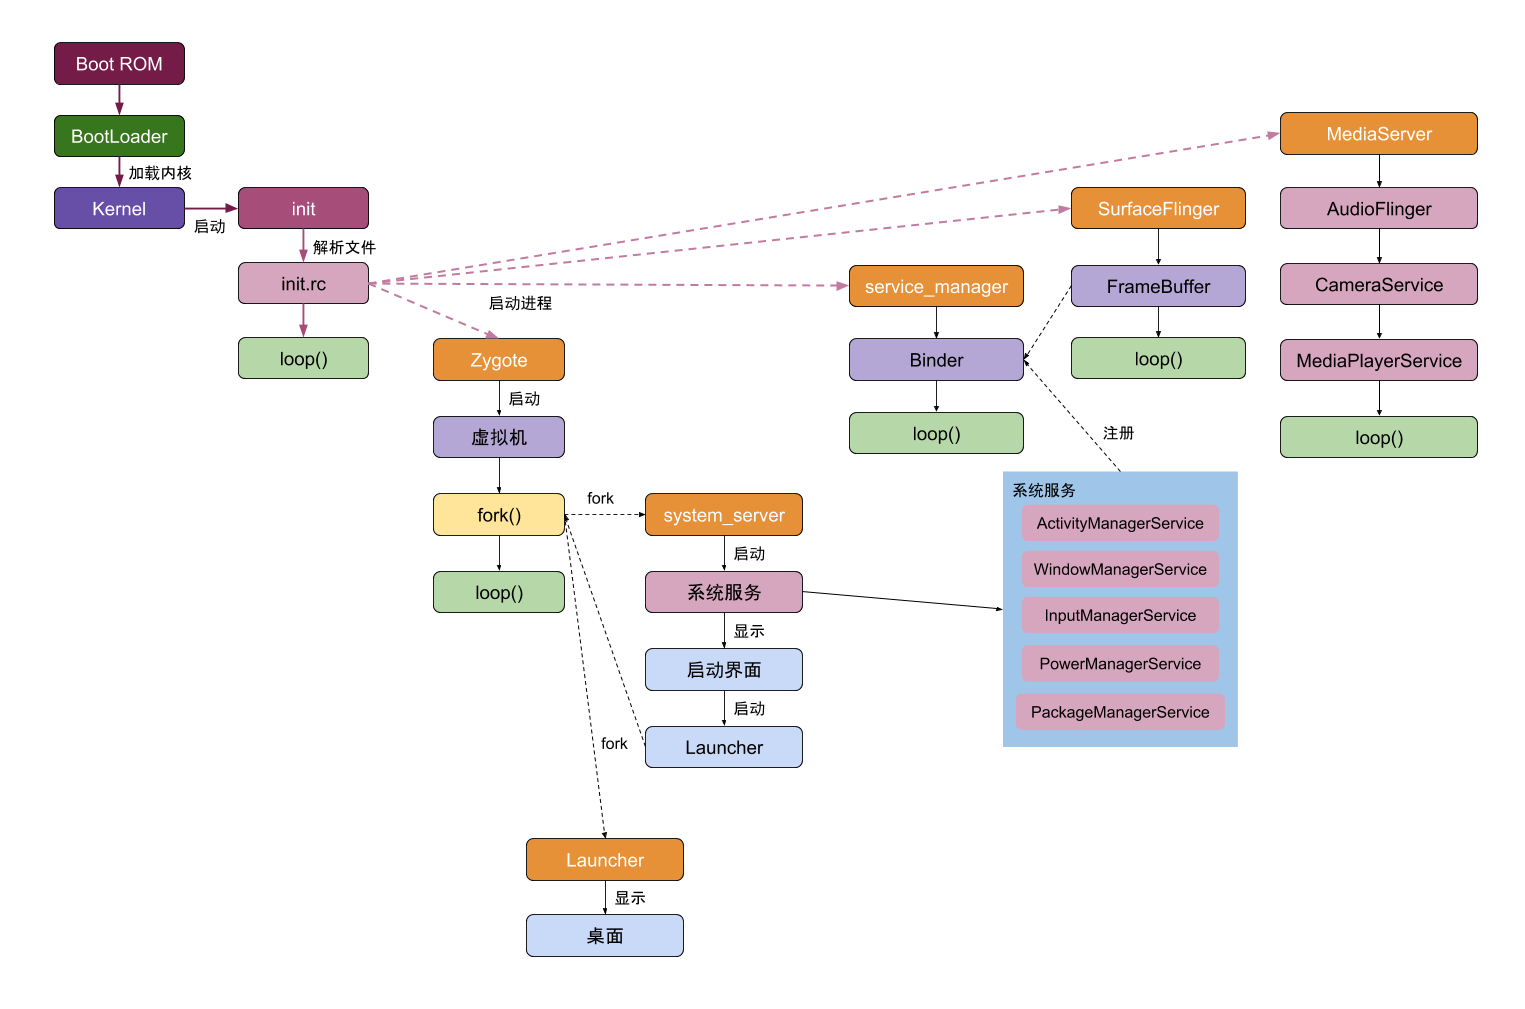
Launcher 作为用户的交互界面,在用户点击 APP 图标的时候提供了打开应用的能力。不同的手机厂商可能会根据 Launcher 做一些定制,比如 miui 就是如此,但最终的原理是一致的。
应用安装的时候,通过 PackageManagerService 解析 apk 的 AndroidManifest.xml 文件,提取出这个 apk 的信息写入到 packages.xml 文件中,这些信息包括:权限、应用包名、icon、apk 的安装位置、版本、userID 等等。packages.xml 文件位于系统目录下/data/system/packages.xml。
启动应用流程
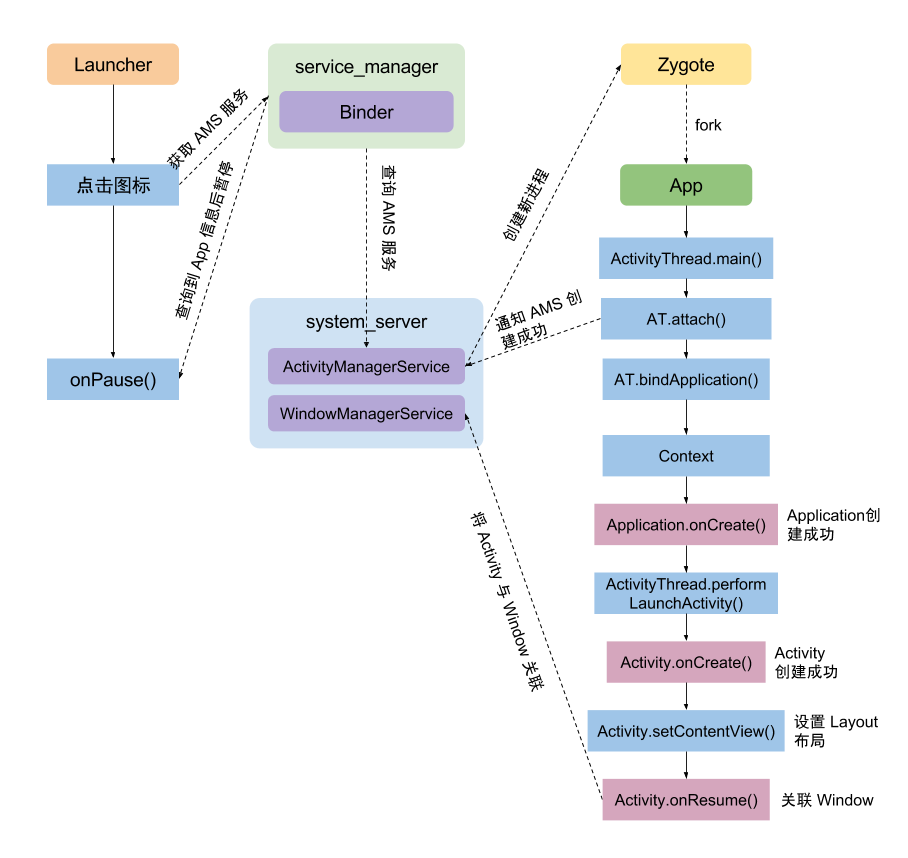
当用户点击桌面上的应用图标后,Launcher 会通过 service_manager 向 AMS 服务发出请求,查询对应的 APP 信息,然后由 Zygote 创建目标 APP 进程。
先梳理一下大致的流程:
- Launcher 通过 Binder 方式沟通 AMS
- AMS 先检查这个 APP 进程是不是已经创建了
- 如果已经创建,则直接调用
realStartActivityLocked 直接到第 7 步
- 否则,AMS 接到请求后让 Zygote 通过 fork 创建 APP 进程,完成
Application.onCreate 、创建应用的上下文和其他各种必要对象,这些对象会在 AMS 中留有备份进行保留。
- 新创建的 APP 进程通过 Binder 发送
ATTACH_APPLICATION_TRANSACTION 通知 AMS
- AMS 接到
ATTACH_APPLICATION_TRANSACTION 后调用 realStartActivityLocked
- 设置进程为顶部 Activity,为新进程创建事务发送调度命令
H.EXECUTE_TRANSACTION
- 进程处理命令消息时调用 Activity.onCreate 并且初始化应用自己的视图
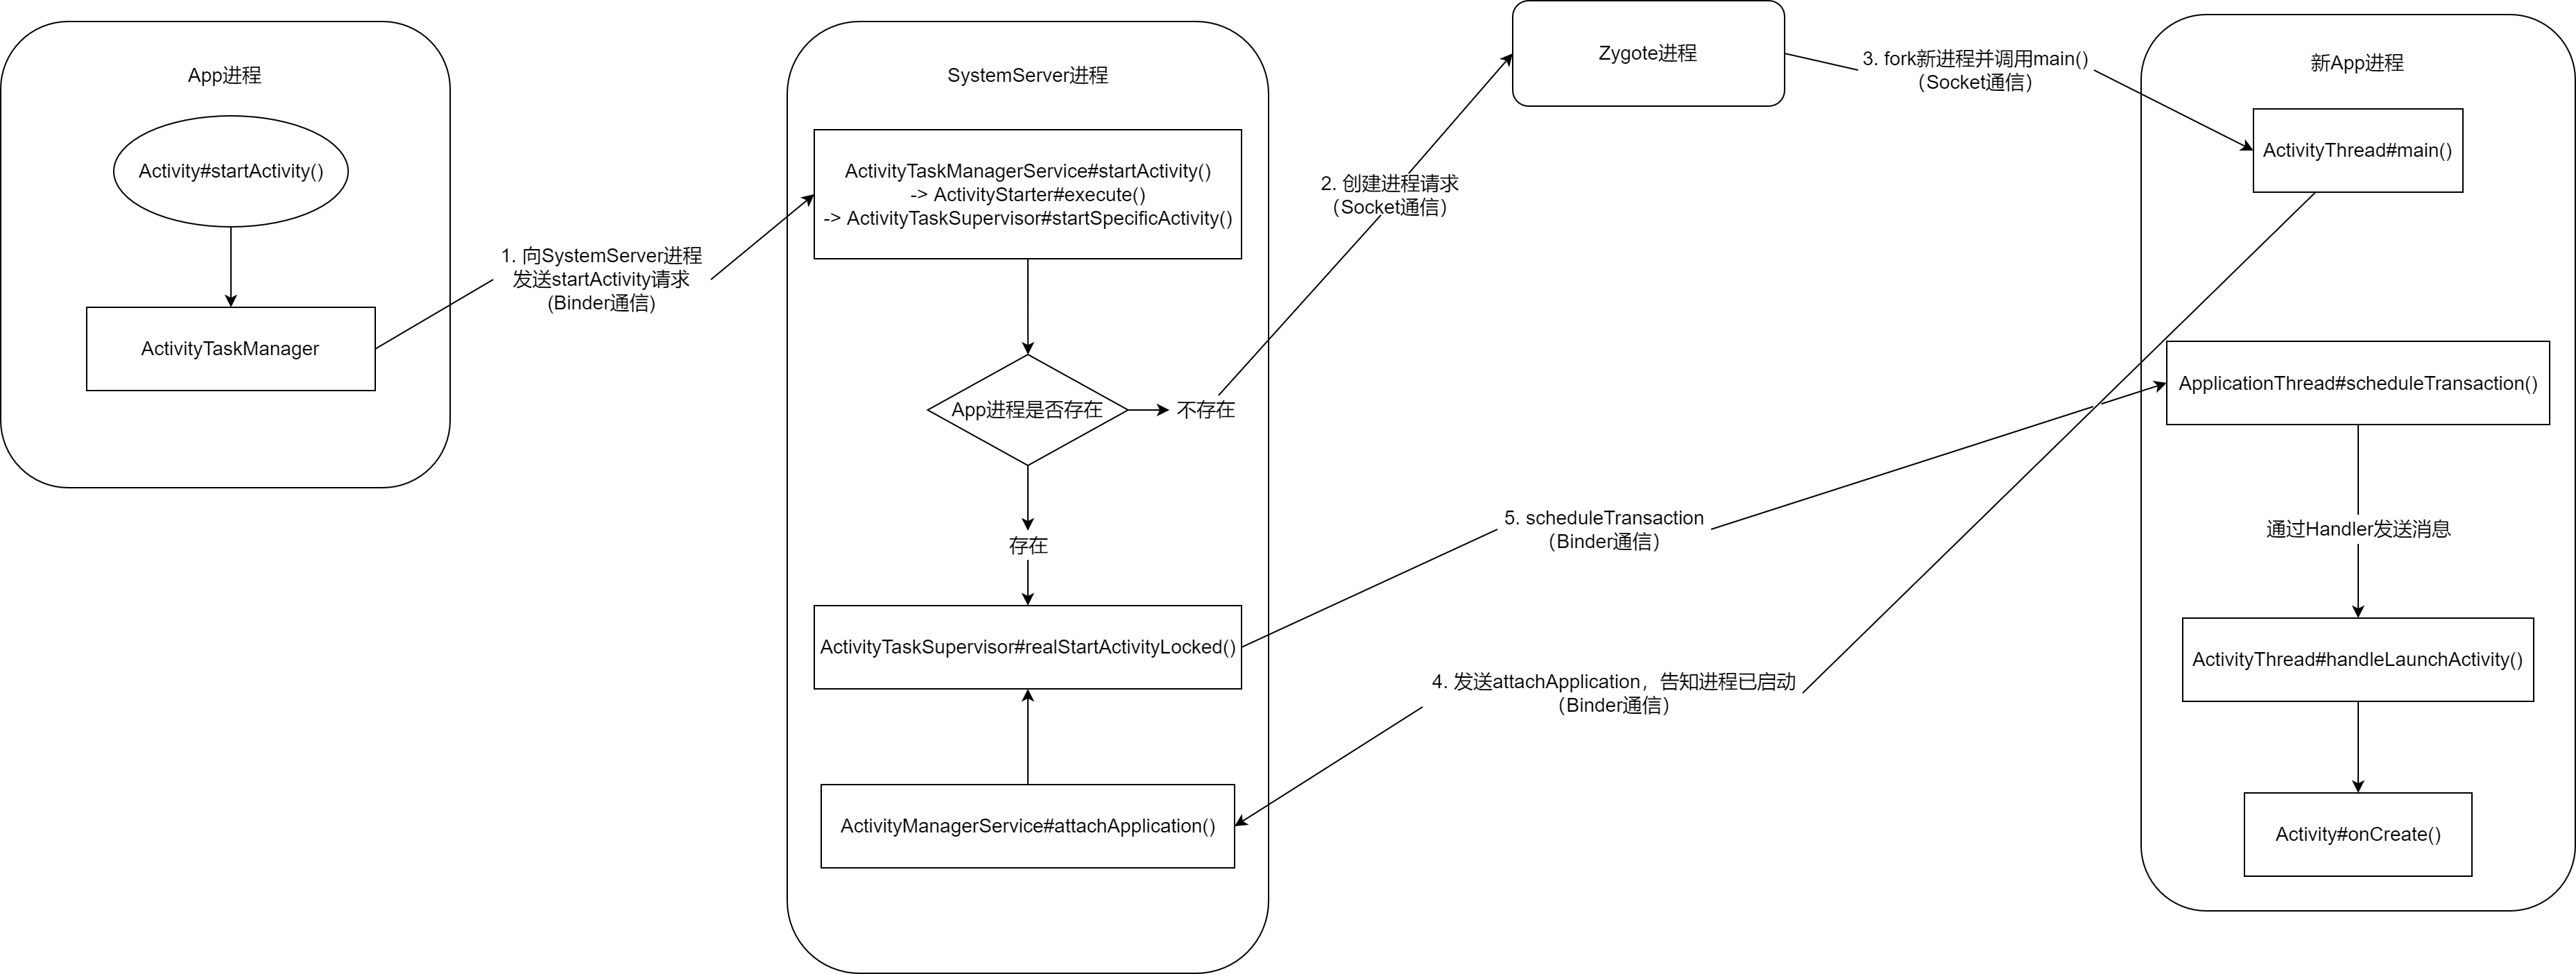
具体到代码实现中,分为几个步骤,首先启动步骤从 Launcher 开始:
- 检查将要打开的目标 APP 的 Activity 是否存在,如果存在就不需要打开了
Launcher.startActivitySafel -> Launcher.startActivity
- 打开目标 Activity
Activity.startActivity
- 通过 ATSM 服务调用该服务提供的 startActivity
Activity.startActivityForResult - Instrumentation.execStartActivity - ActivityTaskManager.getService().startActivity
ActivityManagerNative.getDefault() 会返回一个 ActivityManagerProxy 作为 Launcher 中使用 ActivityTaskManager 的代理,该代理的 startActivity 会发送 START_ACTIVITY_TRANSACTION 来通知 ActivityTaskManager
完成上述过程后,进程从 Launcher 切换到 system_server 中的 ActivityManagerService,也就是 AMS。
- 在 startActivityAsUser 中会先获取用户的 UserID 作为参数然后往下调用 getActivityStartController 中的 starter
startActivity - startActivityAsUser
- 创建新的 intent 对象,获取 ApplicationPackageManager
ActivityStackSupervisor.startActivityMayWait - resolveActivity
- 获取 intent 所指向的 Activity 信息,并保存到 Intent 对象。
PackageManagerService.resolveIntent() - queryIntentActivities()
获取到调用者的进程信息,通过 Intent.FLAG_ACTIVITY_FORWARD_RESULT 判断是否需要进行 startActivityForResult 处理。检查调用者是否有权限来调用指定的 Activity
Activity 有多种启动模式,对 launchMode 的处理,创建 Task 等操作。启动 Activity 所在进程,已存在则直接 onResume(),不存在则创建 Activity 并处理是否触发 onNewIntent()。
ActivityStackSupervisor.startActivityUncheckedLocked - startActivityLocked
- 若找到 resume 状态的 Activity,执行
startPausingLocked() 暂停该 Activity,同时暂停所有处于后台栈的 Activity,这里一般来说会把桌面,也就是 Launcher 暂停掉。
ActivityStack.resumeTopActivityInnerLocked
- 获取要启动的Activity进程信息,若成功,则表示进程已经启动了,通过
realStartActivityLocked 启动这个 activity;否则,通过 AMS 代理调用 startProcessAsync 去创建进程。前者的条件就是前面所述的目标 APP 已经启动过的情况,后者则是从头开始创建这个 APP 进程。
ActivityStackSupervisor.startSpecificActivity
我们考虑后者的情况,程序将会往下调用 startProcessAsync 创建新进程:
1
2
3
4
5
6
7
8
9
10
11
12
| void startProcessAsync(ActivityRecord activity, boolean knownToBeDead, boolean isTop,String hostingType) {
try {
...
final Message m = PooledLambda.obtainMessage(ActivityManagerInternal::startProcess,
mAmInternal, activity.processName, activity.info.applicationInfo, knownToBeDead,
isTop, hostingType, activity.intent.getComponent());
mH.sendMessage(m);
} finally {
Trace.traceEnd(TRACE_TAG_WINDOW_MANAGER);
}
}
|
startProcessAsync 会通过消息的方式让 ATMS 服务在处理该消息时创建对应的进程,调用目标为 ActivityManagerInternal::startProcess
而 ActivityManagerInternal::startProcess 调用ActivityManagerService::startProcessLocked 调用 ProcessList::startProcessLocked 调用 ProcessList::startProcess
如果目标进程是 top app,设置 flag 保证启动的最高优先级,并最终在 startProcess 中创建对应的目标进程,也就是 APP 的进程。
在进程创建成功后,将当前进程切换到新进程,并将 ActivityThread 类加载到新进程,调用 ActivityThread.main
ActivityThread.main :创建主线程的 Looper 对象,创建 ActivityThread 对象,ActivityThread.attach() 建立 Binder 通道,开启 Looper.loop() 消息循环ActivityThread.attach:创建 ActivityManagerProxy 对象,调用基于 IActivityManager 接口的 Binder 通道 ActivityManagerProxy.attachApplication()
1
2
3
4
5
6
7
8
9
10
11
12
13
14
15
16
17
18
19
20
21
22
23
| public static void main(String[] args) {
...
Looper.prepareMainLooper();
...
ActivityThread thread = new ActivityThread();
thread.attach(false, startSeq);
if (sMainThreadHandler == null) {
sMainThreadHandler = thread.getHandler();
}
if (false) {
Looper.myLooper().setMessageLogging(new
LogPrinter(Log.DEBUG, "ActivityThread"));
}
Looper.loop();
throw new RuntimeException("Main thread loop unexpectedly exited");
}
|
Looper 会持续从消息队列中获取消息,然后处理指定的任务。其中,attach 函数调用时会发送 ATTACH_APPLICATION_TRANSACTION 通知 system_server 中的服务。
此时,应用的 ActivityThread 和 ApplicationThread 已经被创建,并创建了消息循环机制。当调用 ActivityThread.attach 时,内部会调用 ActivityManagerProxy.attachApplication ,通过 Binder 来调用 AMS 中的 attachApplication 函数,此时会把 ApplicationThread 传递过去。
attachApplication - attachApplicationLocked 主要有两个关键函数需要关注:
- bindApplication
- ActivityTaskManagerService.LocalService#attachApplication
1
2
3
4
5
6
7
8
9
10
11
12
13
14
15
16
17
18
19
20
21
22
23
24
25
26
27
28
29
30
31
32
33
34
35
36
37
38
39
40
41
42
43
44
45
46
47
48
49
50
51
52
53
54
55
56
57
58
59
60
61
62
63
64
| private boolean attachApplicationLocked(@NonNull IApplicationThread thread,
int pid, int callingUid, long startSeq) {
synchronized (mProcLock) {
app.mState.setCurAdj(ProcessList.INVALID_ADJ);
app.mState.setSetAdj(ProcessList.INVALID_ADJ);
app.mState.setVerifiedAdj(ProcessList.INVALID_ADJ);
mOomAdjuster.setAttachingSchedGroupLSP(app);
app.mState.setForcingToImportant(null);
updateProcessForegroundLocked(app, false, 0, false);
app.mState.setHasShownUi(false);
app.mState.setCached(false);
app.setDebugging(false);
app.setKilledByAm(false);
app.setKilled(false);
app.setUnlocked(StorageManager.isUserKeyUnlocked(app.userId));
}
mHandler.removeMessages(PROC_START_TIMEOUT_MSG, app);
final ProviderInfoList providerList = ProviderInfoList.fromList(providers);
if (app.getIsolatedEntryPoint() != null) {
thread.runIsolatedEntryPoint(
app.getIsolatedEntryPoint(), app.getIsolatedEntryPointArgs());
} else if (instr2 != null) {
thread.bindApplication(processName, appInfo,
app.sdkSandboxClientAppVolumeUuid, app.sdkSandboxClientAppPackage,
providerList,
instr2.mClass,
profilerInfo, instr2.mArguments,
instr2.mWatcher,
instr2.mUiAutomationConnection, testMode,
mBinderTransactionTrackingEnabled, enableTrackAllocation,
isRestrictedBackupMode || !normalMode, app.isPersistent(),
new Configuration(app.getWindowProcessController().getConfiguration()),
app.getCompat(), getCommonServicesLocked(app.isolated),
mCoreSettingsObserver.getCoreSettingsLocked(),
buildSerial, autofillOptions, contentCaptureOptions,
app.getDisabledCompatChanges(), serializedSystemFontMap,
app.getStartElapsedTime(), app.getStartUptime());
} else {
thread.bindApplication(processName, appInfo,
app.sdkSandboxClientAppVolumeUuid, app.sdkSandboxClientAppPackage,
providerList, null, profilerInfo, null, null, null, testMode,
mBinderTransactionTrackingEnabled, enableTrackAllocation,
isRestrictedBackupMode || !normalMode, app.isPersistent(),
new Configuration(app.getWindowProcessController().getConfiguration()),
app.getCompat(), getCommonServicesLocked(app.isolated),
mCoreSettingsObserver.getCoreSettingsLocked(),
buildSerial, autofillOptions, contentCaptureOptions,
app.getDisabledCompatChanges(), serializedSystemFontMap,
app.getStartElapsedTime(), app.getStartUptime());
}
if (normalMode) {
try {
didSomething = mAtmInternal.attachApplication(app.getWindowProcessController());
} catch (Exception e) {
}
}
return true;
}
|
我们先关注 thread.bindApplication ,thread 就是刚刚由新进程传过来的。
函数先调用 bindApplication 向进程发送 H.BIND_APPLICATION 命令,进程收到该命令后,通过 handleBindApplication 处理:
1
2
3
4
5
6
7
8
9
10
11
12
13
14
15
16
17
18
19
20
21
| private void handleBindApplication(AppBindData data) {
final ContextImpl appContext = ContextImpl.createAppContext(this, data.info);
if (ii != null) {
initInstrumentation(ii, data, appContext);
} else {
mInstrumentation = new Instrumentation();
mInstrumentation.basicInit(this);
}
Application app;
try {
app = data.info.makeApplicationInner(data.restrictedBackupMode, null);
mInstrumentation.onCreate(data.instrumentationArgs);
mInstrumentation.callApplicationOnCreate(app);
} finally {
}
}
|
handleBindApplication 初始化 context,然后初始化 Instrumentation 对象,创建 Application 对象,并调用该对象的 onCreate
初始化流程调用链为 makeApplication - newApplication :
1
2
3
4
5
6
7
8
9
10
11
12
13
14
15
16
17
18
19
20
21
22
23
24
25
26
27
28
29
30
31
32
33
34
35
36
37
38
39
40
41
42
43
44
45
46
47
48
49
50
51
52
53
54
55
56
57
58
| private void handleBindApplication(AppBindData data) {
final ContextImpl appContext = ContextImpl.createAppContext(this, data.info);
if (ii != null) {
initInstrumentation(ii, data, appContext);
} else {
mInstrumentation = new Instrumentation();
mInstrumentation.basicInit(this);
}
Application app;
try {
app = data.info.makeApplicationInner(data.restrictedBackupMode, null);
mInstrumentation.onCreate(data.instrumentationArgs);
mInstrumentation.callApplicationOnCreate(app);
} finally {
}
}
public Application makeApplication(boolean forceDefaultAppClass,Instrumentation instrumentation) {
if (mApplication != null) {
return mApplication;
}
String appClass = mApplicationInfo.className;
java.lang.ClassLoader cl = getClassLoader();
ContextImpl appContext = ContextImpl.createAppContext(mActivityThread, this);
app = mActivityThread.mInstrumentation.newApplication(cl, appClass, appContext);
appContext.setOuterContext(app);
}
public Application newApplication(ClassLoader cl, String className, Context context) {
return newApplication(cl.loadClass(className), context);
}
Instrumentation类:
static public Application newApplication(Class<?> clazz, Context context) {
Application app = (Application)clazz.newInstance();
app.attach(context);
return app;
}
final void attach(Context context) {
mBase = base;
mLoadedApk = ContextImpl.getImpl(context).mPackageInfo;
}
|
然后是 makeApplicationInner 的细节
1
2
3
4
5
6
7
8
9
10
11
12
13
14
15
16
17
18
19
20
21
22
23
24
25
26
27
28
29
30
31
32
33
34
35
36
37
38
39
40
41
42
43
44
45
46
47
48
49
50
51
52
53
54
55
56
57
58
| public Application makeApplicationInner(boolean forceDefaultAppClass,
Instrumentation instrumentation) {
return makeApplicationInner(forceDefaultAppClass, instrumentation, false);
}
private Application makeApplicationInner(boolean forceDefaultAppClass,
Instrumentation instrumentation, boolean allowDuplicateInstances) {
if (mApplication != null) {
return mApplication;
}
synchronized (sApplications) {
final Application cached = sApplications.get(mPackageName);
if (cached != null) {
if (!allowDuplicateInstances) {
mApplication = cached;
return cached;
}
}
}
Application app = null;
final String myProcessName = Process.myProcessName();
String appClass = mApplicationInfo.getCustomApplicationClassNameForProcess(
myProcessName);
try {
final java.lang.ClassLoader cl = getClassLoader();
if (!mPackageName.equals("android")) {
initializeJavaContextClassLoader();
}
ContextImpl appContext = ContextImpl.createAppContext(mActivityThread, this);
app = mActivityThread.mInstrumentation.newApplication(
cl, appClass, appContext);
appContext.setOuterContext(app);
} catch (Exception e) {
}
mActivityThread.mAllApplications.add(app);
mApplication = app;
if (!allowDuplicateInstances) {
synchronized (sApplications) {
sApplications.put(mPackageName, app);
}
}
if (instrumentation != null) {
try {
instrumentation.callApplicationOnCreate(app);
} catch (Exception e) {
}
}
return app;
}
|
对于新创建的这个进程而言,当 callApplicationOnCreate 完成调用以后,这个进程的上下文,以及 Application 对象和 Instrumentation 对象都完成的创建和初始化。而在进程这波完成上述的初始化过程中,AMS 那边也没闲着,在发送完相应的命令以后, ActivityManagerService#attachApplicationLocked 继续往下调用 ActivityTaskManagerService.LocalService#attachApplication
1
2
3
4
5
6
7
8
9
10
11
12
13
14
15
16
17
18
19
20
21
22
23
24
25
26
27
28
29
| public boolean attachApplication(WindowProcessController wpc) throws RemoteException {
synchronized (mGlobalLockWithoutBoost) {
try {
return mRootWindowContainer.attachApplication(wpc);
} finally {
}
}
}
public boolean test(ActivityRecord r) {
if (r.finishing || !r.showToCurrentUser() || !r.visibleIgnoringKeyguard
|| r.app != null || mApp.mUid != r.info.applicationInfo.uid
|| !mApp.mName.equals(r.processName)) {
return false;
}
try {
if (mTaskSupervisor.realStartActivityLocked(r, mApp,
mTop == r && r.getTask().canBeResumed(r) ,
true )) {
mHasActivityStarted = true;
}
} catch (RemoteException e) {
}
return false;
}
|
可以注意到,最终这个函数将往下执行 ActivityTaskSupervisor#realStartActivityLocked 完成最后的步骤。而如果此前不需要创建新进程,那么刚打开 APP 的时候就会从这个地方开始恢复进程的状态了。
1
2
3
4
5
6
7
8
9
10
11
12
13
14
15
16
17
18
19
20
21
22
23
24
25
26
27
28
29
30
31
32
33
34
| boolean realStartActivityLocked(ActivityRecord r, WindowProcessController proc,
boolean andResume, boolean checkConfig) throws RemoteException {
final ClientTransaction clientTransaction = ClientTransaction.obtain(proc.getThread(), r.token);
final boolean isTransitionForward = r.isTransitionForward();
final IBinder fragmentToken = r.getTaskFragment().getFragmentToken();
clientTransaction.addCallback(LaunchActivityItem.obtain(new Intent(r.intent),
System.identityHashCode(r), r.info,
mergedConfiguration.getGlobalConfiguration(),
mergedConfiguration.getOverrideConfiguration(), r.compat,
r.getFilteredReferrer(r.launchedFromPackage), task.voiceInteractor,
proc.getReportedProcState(), r.getSavedState(), r.getPersistentSavedState(),
results, newIntents, r.takeOptions(), isTransitionForward,
proc.createProfilerInfoIfNeeded(), r.assistToken, activityClientController,
r.shareableActivityToken, r.getLaunchedFromBubble(), fragmentToken));
final ActivityLifecycleItem lifecycleItem;
if (andResume) {
lifecycleItem = ResumeActivityItem.obtain(isTransitionForward);
} else {
lifecycleItem = PauseActivityItem.obtain();
}
clientTransaction.setLifecycleStateRequest(lifecycleItem);
mService.getLifecycleManager().scheduleTransaction(clientTransaction);
return true;
}
|
函数首先创建 Activity 事务,设置对应的 callback ,以及对应的生命周期 ActivityLifecycleItem,最终开始调度事务 lientLifecycleManager#scheduleTransaction。
1
2
3
4
5
6
7
8
9
10
11
12
13
14
15
16
17
18
19
20
21
22
23
|
void scheduleTransaction(ClientTransaction transaction) throws RemoteException {
final IApplicationThread client = transaction.getClient();
transaction.schedule();
}
public void schedule() throws RemoteException {
mClient.scheduleTransaction(this);
}
@Override
public void scheduleTransaction(ClientTransaction transaction) throws RemoteException {
ActivityThread.this.scheduleTransaction(transaction);
}
void scheduleTransaction(ClientTransaction transaction) {
transaction.preExecute(this);
sendMessage(ActivityThread.H.EXECUTE_TRANSACTION, transaction);
}
|
可以看到,最终由 AMS 向进程发出 H.EXECUTE_TRANSACTION 命令,这个命令同样会被进程那边接受并处理:
1
2
3
4
5
6
7
8
9
10
11
12
13
14
| class H extends Handler {
public void handleMessage(Message msg) {
switch (msg.what) {
case EXECUTE_TRANSACTION:
final ClientTransaction transaction = (ClientTransaction) msg.obj;
mTransactionExecutor.execute(transaction);
if (isSystem()) {
transaction.recycle();
}
break;
}
}
}
|
1
2
3
4
5
6
7
8
| public void execute(ClientTransaction transaction) {
executeCallbacks(transaction);
executeLifecycleState(transaction);
mPendingActions.clear();
}
|
这个函数最终会往下调用 ClientTransactionHandler#handleLaunchActivity,最为抽象类的方法,实际调用 ActivityThread#handleLaunchActivity :
1
2
3
4
5
6
7
8
9
10
11
12
13
14
15
| public Activity handleLaunchActivity(ActivityClientRecord r,
PendingTransactionActions pendingActions, Intent customIntent) {
if (ThreadedRenderer.sRendererEnabled
&& (r.activityInfo.flags & ActivityInfo.FLAG_HARDWARE_ACCELERATED) != 0) {
HardwareRenderer.preload();
}
WindowManagerGlobal.initialize();
GraphicsEnvironment.hintActivityLaunch();
final Activity a = performLaunchActivity(r, customIntent);
return a;
}
|
handleLaunchActivity 最终回调目标 Activity 的 onConfigurationChanged,初始化 WindowManagerService,调用 ActivityThread.performLaunchActivity。
1
2
3
4
5
6
7
8
9
10
11
12
13
14
15
16
17
18
19
| ActivityThread.performLaunchActivity() {
activity = mInstrumentation.newActivity(classLoader,
component.getClassName(), r.intent);
Context appContext = createBaseContextForActivity(r, activity);
activity.attach(context,mInstrumentation,application,...);
mInstrumentation.callActivityOnCreate(activity,...)
}
public void callActivityOnCreate(Activity activity, Bundle icicle) {
prePerformCreate(activity);
activity.performCreate(icicle);
postPerformCreate(activity);
}
|
callActivityOnCreate 中会回调 Activity.performCreate ,其中调用 Activity 的 onCreate 、Activity.setContentView、ActivityThread.performResumeActivity,performResumeActivity 最终会回调 onResume。
总之,到这里之后,新应用的进程算是创建完成了。
结余
弯弯绕绕一大圈,有不少的同名函数,在整理这些资料的时候也是被绕晕了好几次了,希望最终写出来的流程没有太混乱吧。如果有哪里写的不对,还请师傅们多多指教。
参考文章
https://blog.csdn.net/hgy413/article/details/100071667
https://blog.csdn.net/hgy413/article/details/95465321
https://zhuanlan.zhihu.com/p/151010577
https://juejin.cn/post/7028124957141893150
https://github.com/jeanboydev/Android-ReadTheFuckingSourceCode/blob/master/article/android/framework/Android-Activity%E5%90%AF%E5%8A%A8%E8%BF%87%E7%A8%8B.md
https://blog.csdn.net/g984160547/article/details/120676574
https://blog.csdn.net/qq_14876133/article/details/141362098
VirtualApp拆解之二:Activity启动流程 - 简书